It’s easy to start a blog, right? All you need to do is pick a blog host, so I selected Bluehost as my first blog host because it was the cheapest option available. However, I quickly realized that I hadn’t made the smartest choice and switched to SiteGround.
This post contains affiliate links.

My Bluehost Experience
My Bluehost site was, for example, slow so I needed a caching plugin. I also needed a backup plugin, since I didn’t want to pay extra to use Bluehost’s backup service. Sounds easy, but it’s actually quite involved, because, apart from deciding on a plugin, you need to back up to options such as Dropbox which, in turn, involves creating a Dropbox account. Moreover, as a newbie, it wasn’t clear to me how to restore my site from Dropbox. I ultimately ended up switching to SiteGround, because everything I needed came with the basic SiteGround plan. In other words, I didn’t need to spend time researching and installing plugins.
1. Start Right with SiteGround as Your Blog Host
Backing Up Your Blog Is Easy with SiteGround
Backup is easy with SiteGround, since SiteGround automatically backs up your site daily and keeps the backup for 30 days. If you need to restore your site, all you do is hit the restore button. So, SiteGround saves you time and money, since backup is included free of charge. It’s such a big relief to know that your hard work is backed up properly.
SiteGround Is Faster Than Bluehost
Speed is crucial for customer retention and SiteGround is simply faster than Bluehost. In fact, SiteGround automatically gives you free access to its phenomenal SiteGround Optimizer. This is a caching mechanism that is crucial for speed. Not only is file-based caching included but SiteGround also offers 2 exclusive options: dynamic caching and object caching (memcached).
When I used Bluehost, my site was slow and I needed to install a plugin to speed it up. Again, SiteGround saves you this step. SiteGround also has excellent customer support to help you select the right cache settings for your website.
SiteGround Provides Image Compression
With SiteGround’s image compression options, you can reduce your image size by up to 85% with no loss in quality. That means that SiteGround resizes your images to decrease the space they occupy and the time needed for each image to load.
With Bluehost, on the other hand, you need to get an image compression plugin. So, SiteGround saves you time on the confusing topic of image size and compression.
2. Select a SiteGround Hosting Plan
Siteground has 3 plans. If you are new to blogging, I recommend selecting the StartUp plan:
- The StartUp plan is perfect for people with one website that are starting now.
- The GrowBig plan is a great value for money offer, including the option for multiple websites and the Ultrafast PHP that greatly improves website speed.
- The GoGeek plan is perfect for people with e-commerce and larger sites, or more geeky development needs like more server resources and GIT integration.
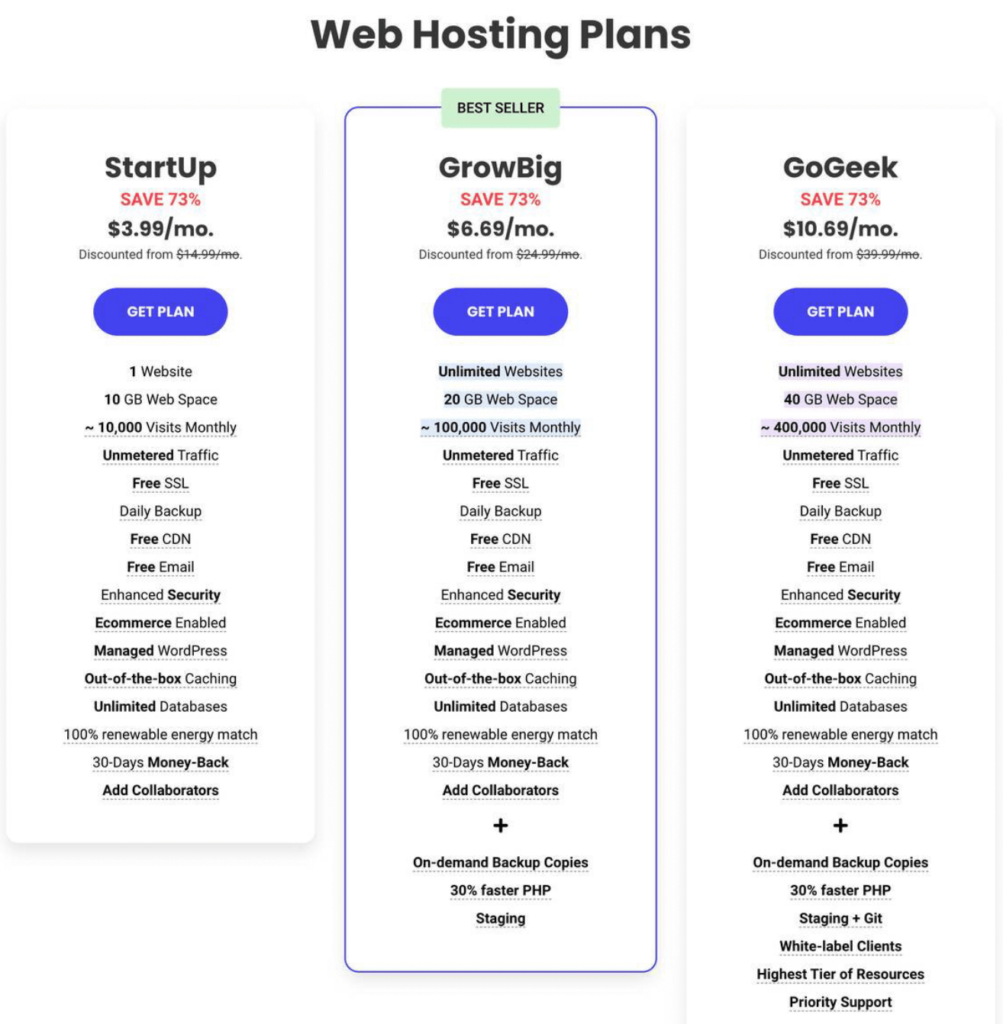
The StartUp Plan is a great way to see if blogging is for you. You can easily upgrade plans later if you have a specific need for it.
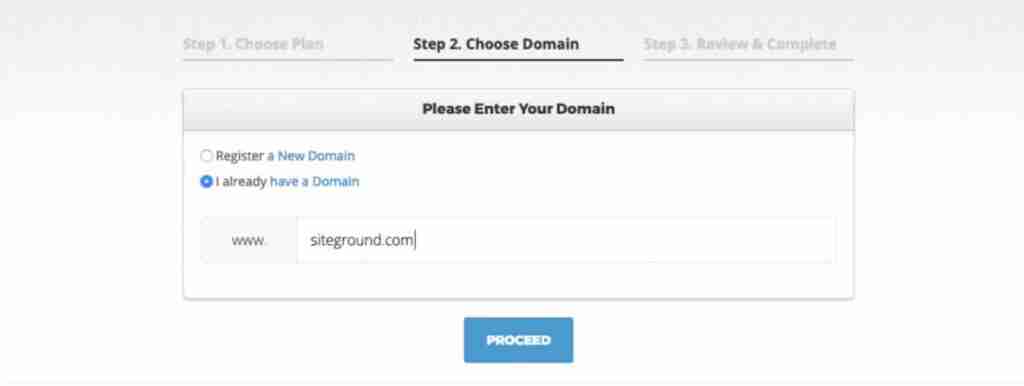
3. Choose a Domain Name for Your Blog
Your domain is your blog’s address. You can create a new domain or sign up with an existing domain.
If you aren’t sure of a domain name, then wait until you are 100% certain. Your domain name is very important. Here are some tips on what it should include:
- Always include your brand name in the domain name.
- If you can, add additional keywords that you are targeting.
- Keep it short & catchy. You need a name people can easily spell and remember.
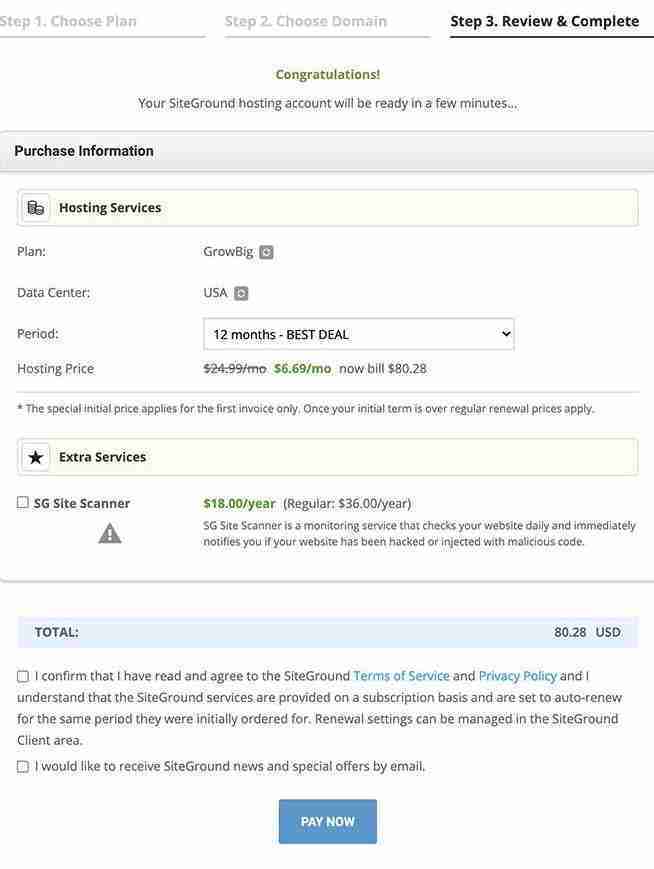
4. Review and Complete the Order
Unlike many other hosting providers, SiteGround’s advertised discount applies to any of the initial periods chosen during the sign up process. This is awesome, especially because other providers often give you the lowest price only if you sign up for the longest period. So, SiteGround is an excellent choice, above all, for first-time bloggers who want to save money and try out blogging.
5. Install WordPress and Pick a Theme So You Can Start Blogging
Install WordPress in just one click. Next, pick a theme. A theme is the foundation of your blog’s design. WordPress comes with free themes but I bought a theme.
Looking for More Articles?
- Review of the Mia Theme by 17th Avenue Designs
- Music for Baking – The Playlist
- Keto Coconut Cake – EASY Layer Cake!
- Keto Chocolate Bundt Cake
- No Car Needed in St. Pete, FL
You can also FOLLOW ME on INSTAGRAM, FACEBOOK and PINTEREST for more great ideas and recipes!


Leave a Reply